by Daisy Dao
You can clean burnt nonstick pans using common household items like baking soda, vinegar, and warm water — no harsh scrubbing required. If you've ever walked away from the stove for just a minute too long, you know the frustration of finding a layer of charred food stuck to your favorite pan. Learning how to clean burnt nonstick pans the right way protects the coating and extends the life of your cookware, which saves you money and hassle in the long run. Before you reach for steel wool or an abrasive cleaner, read through these proven methods that actually work without causing damage. For more tips on keeping your kitchen in top shape, check out our kitchen cleaning guides.
The good news is that most burnt-on messes come off with gentle soaking and a bit of patience, even when the residue looks permanent. Nonstick coatings like PTFE (the material commonly known as Teflon) are designed to release food easily, so burnt residue usually sits on top of the coating rather than bonding to it. That distinction matters because it means you rarely need aggressive tools or chemicals to get the job done.
Whether you're dealing with a thin film of scorched oil or a thick crust of burnt-on food, the approach below walks you through everything from basic soaking to advanced restoration techniques so your pan looks and performs like new again.
Contents
Understanding why food sticks helps you prevent the problem in the first place, which is always easier than cleaning up afterward. Nonstick coatings work by creating a microscopically smooth surface that prevents food proteins from forming bonds with the pan. When you overheat a nonstick pan — typically above 500°F (260°C) — the coating begins to break down and loses its release properties, according to the Wikipedia article on PTFE.
Cooking on high heat is the most frequent culprit, especially with oils that have low smoke points like extra virgin olive oil or butter. Using cooking spray is another common mistake because the propellants in aerosol sprays build up as a sticky residue over time that eventually carbonizes. Leaving an empty pan on a hot burner, even for a couple of minutes, can also cause permanent discoloration and surface damage that traps future food particles.
Pro tip: Always heat your nonstick pan on medium or lower and add oil before the pan gets too hot — this single habit prevents the majority of burnt-on messes.
If you regularly cook foods that tend to splatter or stick, like eggs or sauces, keeping your nonstick pans in good condition becomes even more important. Proper care also ties into reducing food waste since a well-maintained pan means fewer ruined meals that end up in the trash.
You probably already have everything you need in your kitchen right now, which makes this one of the most accessible cleaning tasks you can tackle. The key is choosing tools that are effective on burnt residue but gentle enough to leave the nonstick coating intact.

Soft sponges or microfiber cloths are your best friends here because they lift residue without scratching the surface. A wooden or silicone spatula works well for loosening stubborn chunks during the soaking process. You also want baking soda, white vinegar, and dish soap on hand since these three ingredients form the foundation of every method covered below. Avoid metal scrapers, steel wool, abrasive powder cleansers, and anything labeled "heavy duty" because these will scratch through the nonstick layer permanently.
Each of these techniques works best for different levels of burning, so start with the gentlest option and work your way up only if needed. The goal is always to use the least aggressive method that gets the job done.
Fill the burnt pan with enough water to cover the residue completely, then bring it to a gentle boil on the stove over medium heat. Let it simmer for five to ten minutes while the hot water loosens the carbonized food from the coating. Once the water cools enough to handle safely, use a soft sponge to wipe away the softened residue with regular dish soap. This method handles about 70% of burnt-on messes on its own and should always be your starting point when figuring out how to clean burnt nonstick pans.
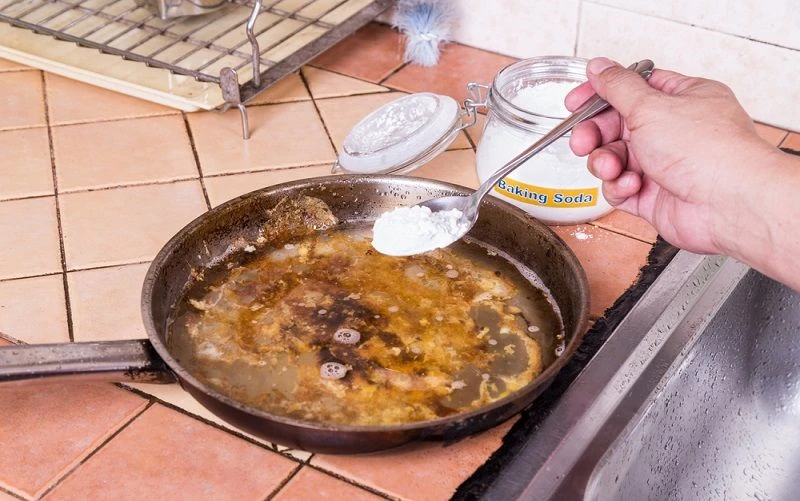
Mix three tablespoons of baking soda with one tablespoon of water to create a thick paste, then spread it evenly across the burnt areas. Let the paste sit for at least fifteen minutes, or overnight for severe burns, so the mild alkaline compound can break down the carbonized residue. Scrub gently with a soft sponge in circular motions, rinse thoroughly, and repeat if any spots remain.

Pour equal parts white vinegar and water into the pan until the burnt area is submerged, then bring the mixture to a boil on the stove. The acidity of the vinegar reacts with the burnt residue and lifts it away from the coating within a few minutes of simmering. Remove the pan from heat, let it cool, then add a tablespoon of baking soda to the liquid for extra fizzing action that targets stubborn spots. This combination of acid and base is the most effective DIY approach for heavy burns that resist simpler methods.

Warning: Never combine vinegar and baking soda in a sealed container — the carbon dioxide gas they produce builds pressure rapidly and can cause a messy eruption.
If you're new to cookware maintenance, start with the boiling water method every time because it requires no special ingredients and carries zero risk of damaging your pan. You can graduate to baking soda paste once you're comfortable, and it handles the vast majority of everyday burns from cooking sessions where you got distracted or used slightly too much heat.
For advanced deep cleaning — the kind you need after a serious scorching incident — the vinegar-baking soda combination is your strongest safe option. Some experienced home cooks also use a mixture of hydrogen peroxide and baking soda for extremely stubborn discoloration, applying the paste and letting it sit for several hours before scrubbing. This approach targets the polymerized oil layer (the dark brown film that builds up over months) rather than just the most recent burn.
Regardless of which method you choose, always season your pan after a deep clean by rubbing a thin layer of vegetable oil over the surface and heating it on low for two minutes. This restores the nonstick properties and keeps food from sticking during your next cooking session. Keeping your kitchen organized with proper cupboard organization also helps you store pans correctly so they don't get scratched by other cookware stacked on top.
Choosing the right cleaning method depends on how severe the burn is, how much time you have, and what supplies are available in your kitchen. The table below gives you a quick side-by-side comparison so you can pick the best approach for your situation without guessing.
| Method | Best For | Time Needed | Effort Level | Risk to Coating |
|---|---|---|---|---|
| Boiling Water Soak | Light to moderate burns | 10–15 min | Low | None |
| Baking Soda Paste | Moderate to heavy burns | 20–60 min | Medium | Very low |
| Vinegar + Baking Soda | Heavy burns, grease buildup | 15–30 min | Medium | Very low |
| Hydrogen Peroxide Paste | Old polymerized oil stains | 2–4 hours | Low | Low |
| Commercial Nonstick Cleaner | All burn levels | 10–20 min | Low | Low (if product is rated for nonstick) |
| Steel Wool / Abrasive Pad | Never use on nonstick | N/A | N/A | High — destroys coating |
As the table shows, there's no reason to reach for abrasive tools when gentler methods handle every realistic scenario you'll encounter. The boiling water method alone solves most problems, and combining it with baking soda or vinegar covers everything else.
One of the best things about cleaning burnt nonstick pans at home is that the cost is practically nothing, especially compared to buying a replacement pan. A box of baking soda runs about a dollar at any grocery store, and a bottle of white vinegar costs roughly the same, so your total investment for the two most effective cleaning agents is around two dollars. That's enough supply to clean your pans dozens of times over.
Commercial nonstick cleaners like Bar Keepers Friend Soft Cleanser (which is safe for nonstick when used with a soft sponge) typically cost between five and eight dollars per bottle and last for months of regular use. Compare that to the cost of replacing a quality nonstick pan, which ranges from twenty-five dollars for a budget option to over a hundred dollars for premium brands like All-Clad or Scanpan. Learning how to clean burnt nonstick pans properly can easily save you fifty to a hundred dollars per year if you cook regularly.
Budget tip: Keep a dedicated box of baking soda under your kitchen sink specifically for pan cleaning — it stays fresh for months and costs less than a cup of coffee.
If you're looking for other budget-friendly kitchen projects, our guide on redoing kitchen cabinets on a budget shows how small investments can transform your entire cooking space.
Not every burnt pan is worth saving, and knowing the difference keeps you from wasting time on cookware that has already reached the end of its useful life. If the nonstick coating is visibly flaking, peeling, or chipping, replace the pan immediately because damaged coating can mix into your food and the pan will never perform properly again regardless of how well you clean it.
You should also consider replacing your pan if food sticks consistently even after thorough cleaning and re-seasoning, because that usually means the coating has worn through from repeated overheating. Most nonstick pans have a functional lifespan of three to five years with regular use, so if yours has been in rotation for longer than that and shows persistent sticking issues, a replacement is the smarter investment.
On the other hand, if the coating is still intact and the surface feels smooth when you run your finger across it, cleaning and maintaining the pan is absolutely the right call. Even pans with heavy brown discoloration from oil buildup can be restored to near-new condition using the methods described above, and that discoloration is cosmetic rather than a sign of coating failure.
No, you should never use steel wool, metal scrapers, or abrasive scouring pads on nonstick cookware because they scratch through the coating and permanently destroy the nonstick properties. Stick with soft sponges, microfiber cloths, or wooden utensils for all cleaning tasks.
A burnt pan with an intact coating is safe to use after proper cleaning, but if the coating is flaking, peeling, or chipping, you should stop using it and replace the pan to avoid ingesting coating particles with your food.
For light burns, a 10-to-15-minute boiling water soak is usually enough. For heavy or carbonized residue, apply a baking soda paste and let it sit for one to four hours, or overnight for the most stubborn buildup.
White vinegar is safe for nonstick coatings when used in the diluted concentrations recommended for cleaning, and a brief simmer of five to ten minutes poses no risk to PTFE or ceramic nonstick surfaces.
Brown stains are usually caused by polymerized cooking oil that builds up over time, especially when you use cooking sprays or heat oil past its smoke point. Regular cleaning with baking soda paste prevents this buildup from becoming permanent.
Most manufacturers advise against dishwashing nonstick pans because the harsh detergents and high heat can degrade the coating over time. Hand washing with warm soapy water and a soft sponge is always the safest approach for maintaining the nonstick surface.
Now that you know how to clean burnt nonstick pans using simple ingredients you already have at home, pick the method that matches the severity of your situation and give it a try today. Start with the boiling water soak for light messes, move to baking soda or vinegar for tougher jobs, and remember that gentle patience always beats aggressive scrubbing when it comes to protecting your nonstick coating. Your pans will last years longer, your food will taste better, and you'll spend a lot less money replacing cookware that still has plenty of life left in it.
 |
 |
 |
 |

About Daisy Dao
Daisy Dao grew up in Honolulu, Hawaii, where coastal living and access to fresh local ingredients shaped her approach to home cooking from an early age. She has spent years experimenting with seafood preparation, healthy cooking methods, and ingredient substitutions — developing hands-on familiarity with a wide range of kitchen tools, techniques, and produce. At BuyKitchenStuff, she covers healthy recipes, cooking techniques, and ingredient substitution guides.
Check for FREE Gifts. Or get our Free Cookbooks right now.
Disable the Ad Block to reveal all the recipes. Once done that, click on any button below
|
|
|
|
