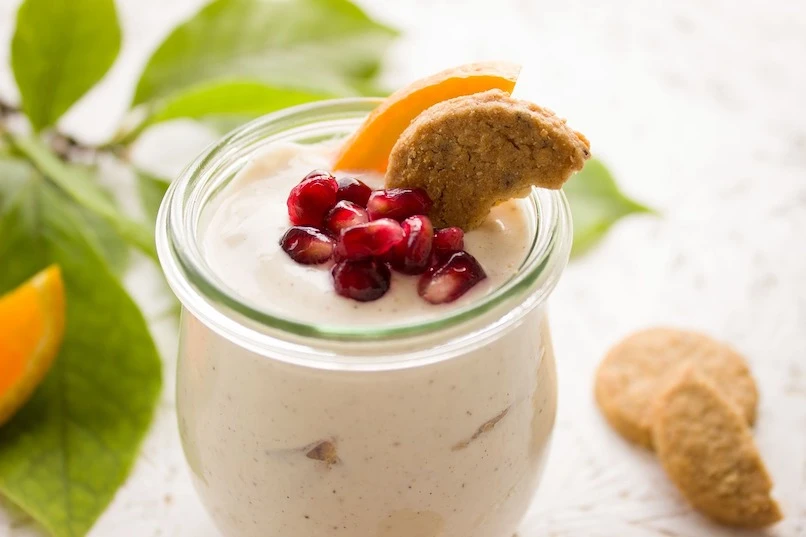
Make creamy homemade vegan yogurt with just two ingredients and simple steps for a delicious dairy-free alternative every day.
by Rick Goldman
Last winter, our team spent a full weekend testing every homemade vegan yogurt recipe we could find online — and most of them failed spectacularly. Thin, sour, grainy batches filled the kitchen sink. But after dozens of rounds, we nailed a reliable method that produces thick, tangy, probiotic-rich yogurt from plant milk alone. This guide covers everything our team has learned about making vegan yogurt at home, from choosing the right base milk to fermenting like a pro. Whether someone is exploring plant-based cooking for the first time or looking to cut dairy for good, this is the only resource needed.
Vegan Yogurt Recipe
The appeal is obvious. Store-bought vegan yogurt runs $2–$6 per container, often loaded with gums, stabilizers, and added sugars. A homemade batch costs a fraction of that and takes under 15 minutes of active work. The rest is waiting — fermentation does the heavy lifting. Our team has served this to committed dairy lovers who genuinely couldn't tell the difference.
What follows is a complete breakdown: cost analysis, the best plant milks to use, common pitfalls, beginner versus advanced techniques, and the myths that keep people from trying. Anyone interested in building a healthier diet will find homemade vegan yogurt fits right in.
One of the biggest reasons our team recommends making vegan yogurt at home is the savings. Most people assume plant-based eating is expensive, but the numbers tell a different story.
Ingredient-by-Ingredient Breakdown
A standard one-quart batch needs just three things:
Plant milk (4 cups) — $0.80–$2.50 depending on brand and type
Probiotic capsules or starter culture — $0.30–$0.75 per batch (buying in bulk drops this further)
Thickener (optional) — tapioca starch or agar-agar, roughly $0.15 per batch
Total cost per quart: $1.25–$3.40. Compare that to $5.99 for a 24-oz tub of Kite Hill at the grocery store. Over a month of weekly batches, the savings add up fast — especially for households going through multiple containers per week.
Batch Savings vs. Store-Bought
Item
Homemade (per quart)
Store-Bought (per quart)
Monthly Savings (4 batches)
Coconut milk yogurt
$1.80
$7.50
$22.80
Soy milk yogurt
$1.25
$6.00
$19.00
Cashew milk yogurt
$3.40
$8.00
$18.40
Oat milk yogurt
$1.50
$6.50
$20.00
Almond milk yogurt
$1.60
$6.00
$17.60
The numbers speak for themselves. Even the most expensive homemade option (cashew-based) still saves nearly $20 a month. Anyone trying to reduce food waste will also appreciate that homemade batches can be sized to exact needs — no more half-eaten tubs going bad in the fridge.
Plant Milk Showdown: Which Base Works Best
Not all plant milks ferment equally. Our team has tested over a dozen brands and types. The differences in final texture and flavor are dramatic.
Fat and Protein Content Matter
The golden rule: higher fat and protein produce thicker yogurt. That's why full-fat coconut milk and soy milk dominate. Thin milks like rice or standard almond need significant thickener help.
Full-fat coconut milk (canned) — Richest, thickest result. Mild coconut flavor. Our top recommendation for beginners.
Soy milk — Best protein content among plant milks. Ferments beautifully. Choose unsweetened varieties with minimal ingredients.
Cashew milk (homemade, blended thick) — Creamy and neutral. Requires more culture time but yields an incredibly smooth product.
Oat milk — Naturally sweet, pleasant flavor. Tends toward thin unless a thickener is added.
Almond milk — Widely available but low in protein and fat. Needs agar-agar or tapioca starch to hold structure.
Yougurt Recipe
Our Top Three Picks
Full-fat canned coconut milk — foolproof for a first batch
Unsweetened soy milk — best balance of cost, nutrition, and texture
Homemade cashew milk — premium texture for those willing to put in extra effort
For anyone exploring plant-based eating, our guide on whether rice noodles are vegan covers similar ingredient-sourcing territory.
Pro tip: Avoid plant milks with added oils, gums, or carrageenan — these interfere with fermentation and produce inconsistent results. The fewer ingredients on the label, the better the yogurt.
Five Mistakes That Ruin Every Batch of Homemade Vegan Yogurt Recipe Attempts
Our team has made every mistake possible so others don't have to. These are the five that cause the most failures.
Temperature Errors
Adding culture to hot milk. Probiotics die above 115°F (46°C). The milk must cool to 105–110°F before adding the starter. No thermometer? Wait until the jar feels warm but comfortable to hold for 10 seconds.
Fermenting too cold. Below 95°F, fermentation stalls. The yogurt stays liquid. An oven with just the light on typically holds 100–110°F — perfect. A quality kitchen appliance like a yogurt maker eliminates the guesswork entirely.
Fermenting too hot. Above 115°F, cultures die and the batch turns into flavored milk. Temperature control is non-negotiable.
Culture and Timing Problems
Using expired or weak probiotic capsules. Check that the supplement contains Lactobacillus or Streptococcus thermophilus strains. Dead cultures produce nothing. Our team keeps capsules refrigerated and checks expiration dates religiously.
Not fermenting long enough. Most people pull the batch too early. Minimum 8 hours is essential — 12–24 hours produces tangier, thicker results. Patience is the single biggest factor separating good vegan yogurt from great.
Making Yougurt
Fixing Runny, Grainy, or Sour Yogurt
Even experienced home fermenters run into issues. Here's how our team diagnoses and fixes the most common problems.
Texture Fixes
Too runny: Add 1–2 tablespoons of tapioca starch dissolved in cold milk before heating. Alternatively, strain through cheesecloth for 2–4 hours — this creates a thick Greek-style consistency.
Grainy or lumpy: Usually caused by overheating the milk or adding thickener without properly dissolving it first. Blend the finished yogurt in a high-speed blender for 30 seconds. It smooths right out.
Separated (watery top layer): This is whey. Completely normal. Stir it back in — it's full of probiotics and nutrients.
Flavor Corrections
Too sour: Fermented too long or at too high a temperature. Shorten the next batch by 2–4 hours. Adding a teaspoon of maple syrup after fermentation also balances acidity.
No tang at all: Culture was weak or dead. Try a different probiotic brand, or use 2 tablespoons from a store-bought vegan yogurt with live cultures as a starter.
Bitter aftertaste: Common with almond milk bases. Switch to soy or coconut, or blend in a ripe banana after fermentation.
Warning: Never re-culture from a failed batch. If the yogurt didn't set properly, the bacteria population is compromised. Always start fresh with new culture for the next attempt.
There's a massive gap between a first attempt and a perfected weekly routine. Here's how both ends of the spectrum look.
The Beginner Method
This is the homemade vegan yogurt recipe our team recommends for a first batch:
Heat 4 cups of full-fat canned coconut milk to 180°F (steaming, not boiling). This kills any unwanted bacteria.
Cool to 105–110°F. Pour into a sterilized glass jar.
Open 2 probiotic capsules (50+ billion CFU total) and stir the powder in thoroughly.
Cover with a clean towel or loose lid. Place in the oven with only the light on.
Wait 12 hours. Do not open, stir, or check.
Refrigerate for at least 4 hours before eating — it thickens significantly as it cools.
That's it. No fancy equipment. No special skills. The entire active time is about 10 minutes.
Yougurt Is Ready
Advanced Culturing Techniques
Once the basics are solid, there are several ways to level up:
Heirloom cultures: Specific vegan yogurt starter cultures (like those from Cultures for Health) produce more consistent results than probiotic capsules and can be re-cultured indefinitely.
Double fermentation: Ferment 12 hours, stir, then ferment another 8–12 hours. This dramatically increases probiotic count and tang.
Cashew cream base: Soak 2 cups raw cashews overnight, blend with 2 cups water until silky smooth, then culture. The result rivals any artisan dairy yogurt in texture.
Flavor infusions before culturing: Steep vanilla bean, cardamom pods, or lemon zest in the heated milk, then strain before adding culture. The flavors integrate deeply.
Straining for labneh: After full fermentation, strain through cheesecloth for 12–24 hours. The result is a thick, spreadable vegan cream cheese that pairs beautifully with items like peanut butter on toast.
Vegan Yogurt Myths That Need to Go
Our team encounters the same misconceptions constantly. Here are the ones that need correcting.
Nutrition Myths
"Vegan yogurt has no protein." False. Soy-based yogurt delivers 6–9 grams of protein per cup — comparable to many dairy yogurts. The base milk choice determines the protein content, not the vegan label.
"Plant-based probiotics aren't as effective." The same Lactobacillus strains used in dairy yogurt thrive in plant milk. Fermentation is fermentation. The bacteria don't care about the source.
"Homemade versions lack calcium." Many plant milks are fortified with calcium and vitamin D. Check the label. A fortified soy milk yogurt can match dairy's calcium content almost exactly.
Process Myths
"A yogurt maker is required." Absolutely not. An oven with the light on, an Instant Pot on the yogurt setting, or even a cooler with a jar of warm water all work. Dedicated equipment helps with consistency but is never mandatory.
"Homemade vegan yogurt doesn't keep." Properly fermented and refrigerated, it lasts 7–10 days easily. Some batches in our kitchen have stayed good for two weeks. The acidity from fermentation is a natural preservative.
"Coconut yogurt always tastes like coconut." Full-fat canned coconut milk has a mild flavor that nearly disappears after fermentation and flavoring. Add vanilla or fruit and most people can't identify the base.
Frequently Asked Questions
Can store-bought vegan yogurt be used as a starter culture?
Yes, as long as it contains live active cultures. Use 2–3 tablespoons per quart of plant milk. Check the label for Lactobacillus or S. thermophilus — if those strains are listed, it will work as a starter.
How long does homemade vegan yogurt last in the fridge?
Expect 7–10 days when stored in a clean, sealed glass jar. Our team has pushed it to 14 days with no issues, though tang increases over time. If it smells off or shows mold, discard the batch.
Why did the yogurt not thicken at all?
The most common cause is dead or insufficient culture. Other culprits include fermenting below 95°F or using a plant milk with very low fat and protein (like rice milk). Switch to full-fat coconut or soy milk and use fresh probiotic capsules.
Is it safe to ferment at room temperature?
Only if room temperature stays between 95–115°F, which is unlikely in most homes. Below that range, harmful bacteria can outcompete the yogurt cultures. An oven with the light on or a yogurt maker provides the stable warmth needed for safe fermentation.
What's the best thickener for vegan yogurt?
Tapioca starch is our top choice — it creates a smooth, creamy texture without altering flavor. Agar-agar works well for a firmer set. Avoid cornstarch, which tends to produce a pasty, chalky mouthfeel in fermented products.
Can the same batch be re-cultured for the next one?
Yes, for 4–6 generations. Reserve 3 tablespoons from each batch before adding any flavoring. After several generations, the culture weakens and a fresh starter is needed. Heirloom cultures can be re-cultured indefinitely with proper care.
Does vegan yogurt work in recipes that call for dairy yogurt?
In most cases, it's a direct 1:1 substitute. It performs well in smoothies, baked goods, salad dressings, and marinades. For recipes requiring high heat, soy-based versions hold up best due to their higher protein content.
Next Steps
Make a first batch this weekend — grab a can of full-fat coconut milk and a bottle of refrigerated probiotic capsules. Follow the beginner method above and give it a full 12-hour ferment. The total investment is under $5.
Experiment with a second base milk — once the coconut batch succeeds, try unsweetened soy milk for a higher-protein option. Compare the two side by side and decide which texture and flavor profile fits best.
Build a weekly routine — set a recurring day (our team uses Sunday evenings) to start a new batch. Reserve 3 tablespoons from each finished jar as starter for the next one. Within a month, the process becomes second nature.
Try one advanced technique — whether it's double fermentation, straining for labneh, or infusing vanilla bean before culturing, pick one upgrade and test it on the next batch. Small iterations build skill fast.
Rick Goldman grew up traveling the Pacific Coast and developed an early appreciation for regional and international cuisines through exposure to diverse food cultures from a young age. That culinary curiosity shaped his approach to kitchen gear — he evaluates tools based on how well they perform across different cooking styles, ingredient types, and meal occasions. At BuyKitchenStuff, he covers kitchen equipment reviews, recipe guides, and food-focused buying advice.