by Daisy Dao
You know that moment when you reach for the salt shaker and your sleeve drags right through a sticky, brownish film that has been quietly building up on the stovetop since last weekend's pasta sauce disaster? That feeling of quiet dread is something most home cooks know well, and it's usually the push you need to finally do something about it. Learning how to clean grease from stove surfaces properly — not just a quick half-hearted wipe — is one of those kitchen habits that pays off every single week, and building that habit is a lot more straightforward than most people expect. If you want to make this part of a bigger effort, the kitchen cleaning category here at BuyKitchenStuff has plenty of guides to help you keep every corner of your cooking space in great shape.

Grease builds up faster than most people expect, and what starts as a barely noticeable thin film can turn into a thick, baked-on layer that takes real effort to remove without the right approach. The basic science behind degreasing involves breaking down fatty compounds using either a solvent or an alkaline solution — which is exactly why dish soap and baking soda work so reliably in the kitchen and why you don't always need harsh industrial products to get good results.
Whether you're cooking on a gas range, an electric coil stove, or a smooth-top ceramic surface, the core approach to dealing with stove grease is the same: the right product, the right method, and a consistent routine that keeps buildup manageable before it becomes a real problem. This guide walks you through all three, from choosing the right tools to working through each part of your stove, and helps you avoid the common habits that make cleaning harder than it needs to be.
Contents
Before you start scrubbing, having the right supplies gathered in one place makes the whole process go faster and much less frustrating. You don't need a professional cleaning kit or anything particularly expensive — just a thoughtful selection of what actually works on kitchen grease without damaging the surfaces you're working on.
Here's a solid starter kit for tackling stove grease on most surfaces:
If you enjoy cooking dishes that naturally produce a lot of fat — things like the techniques covered in our guide to reheating steak on the stovetop — keeping these supplies somewhere easily accessible means cleanup never turns into a big, drawn-out production after the meal.
Not every cleaner works on every surface, and using the wrong one can cause damage that's harder to fix than the grease itself. Gas stove grates and cast iron burner components tolerate more abrasive scrubbing, while smooth-top ceramic surfaces scratch easily and need gentler treatment. Stainless steel panels need a careful touch — always wipe with the grain of the metal, not against it, or you'll end up with visible scratches that dull the finish over time and become increasingly hard to hide.
Working through each part of your stove methodically gives you better results than a rushed, all-at-once scrub session, and it lets your cleaning solution do most of the heavy lifting rather than depending entirely on physical force. The goal every time you need to clean grease from stove surfaces is to soften the buildup before you start scrubbing — not after.
Gas stove grates are usually the greasiest part of the whole stove, since they sit directly over the burner flame and catch every drip, splatter, and overflow that happens during cooking. Here's a process that works reliably on most cast iron or enamel-coated grates:
If you regularly use your cast iron grill pan on the stovetop for high-heat cooking, you already know how much residue that kind of cooking leaves behind — and the same patience you bring to cast iron care applies directly to your grates as well.
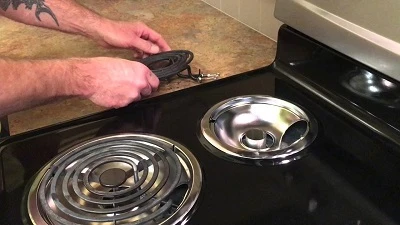
Electric stoves have their own set of cleaning challenges, particularly around the heating coils and the drip pans (the bowl-shaped pieces that catch spills underneath each burner element). The coils themselves should never be submerged in water, but you can wipe them gently with a damp cloth once they've cooled down completely after use. The drip pans, however, can usually be removed and soaked just like gas grates.
There's a fair amount of well-meaning but inaccurate advice floating around about how to clean grease from stove surfaces, and some of it can actually make the job harder or cause damage you didn't expect. Clearing up a few of the most common misconceptions can save you time, money, and frustration.

Many people assume that a heavy-duty oven cleaner or industrial degreaser will always outperform mild dish soap and baking soda, but that's not really how it works on kitchen surfaces. Harsh chemicals can strip protective coatings from your stove's finish, especially on smooth-top and stainless steel models where the surface material is more sensitive than it looks. Mild cleaners used consistently outperform strong ones used occasionally, and they're much gentler on your stove over months and years of regular use. Natural options like citric acid — which you can read more about in this overview of citric acid sources and uses — are surprisingly effective on grease when you give them a few minutes of contact time before scrubbing.
Pro tip: Spray your cleaner and walk away for five minutes before touching the stove — letting the solution sit does most of the heavy lifting, and you'll use far less physical effort as a result.
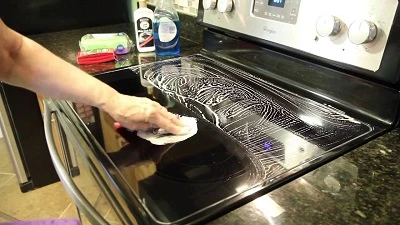
Grease that you can't see is still there, building up in thin invisible layers with every cooking session until heat bakes it into something genuinely stubborn. By the time the buildup is visually obvious, you're already dealing with something that requires a much longer soak and significantly more scrubbing. Cleaning after every few uses — even just a quick wipe — keeps the whole job manageable before it compounds into a real project.
This is especially worth keeping in mind if you frequently reheat leftovers on the stovetop, where splattering is common. Even something as simple as reheating pasta with a little added olive oil or butter can leave a fine greasy film across the surrounding surface that you might not even notice until it's baked on solid after your next high-heat cooking session.
The single biggest factor in how hard stove cleaning is on any given day is how long you've let the grease sit and harden. A regular cleaning schedule — even a light, informal one — dramatically reduces the effort required each time and keeps your stove looking noticeably cleaner between deeper sessions without taking much time out of your day.

You don't need to deep-clean your stove every day — that's unrealistic for most households and honestly unnecessary if you maintain a few small habits that prevent heavy accumulation from forming in the first place.
Warning: Never clean any part of your stove — especially around the knobs and control panel — while it's still hot; surfaces can warp and moisture can get into electrical components and cause damage over time.
If you cook a lot of lower-fat, vegetable-forward meals — and there are some genuinely good ideas in the cheap and easy healthy meals guide on this site — you'll naturally generate less grease per cooking session, which means your maintenance routine stays lighter with less frequent deep cleaning required.
Once a month, it's worth taking a more systematic approach that goes beyond the regular wipe-down. Set aside around 45 minutes and work through the stove from top to bottom, soaking removable parts while you wipe down fixed surfaces so you're using your time efficiently rather than waiting around.
If you're ever concerned about ventilation when using cleaning chemicals in a smaller or enclosed kitchen — which is a legitimate safety consideration — the guide to carbon monoxide poisoning symptoms and prevention on this site covers some useful basics about kitchen air safety that are worth reviewing.
One of the most appealing aspects of a solid stove cleaning routine is that it really doesn't have to cost much at all. With the right approach, you can maintain a spotless stovetop almost entirely on supplies you probably already own, and even the more specialized products are generally inexpensive compared to what it costs to deal with long-neglected buildup or damaged surfaces.
Homemade cleaning solutions — typically baking soda, white vinegar, and dish soap in various combinations — cost only a few cents per use and work well on most fresh and moderate grease buildup. Commercial degreasers and foaming oven cleaners cost more per use but can cut through heavily baked-on grease faster, which can be worth it for a one-time deep clean after a long period without proper maintenance.
| Cleaner Type | Approximate Cost per Use | Best For | Watch Out For |
|---|---|---|---|
| Dish soap + warm water | Under $0.05 | Fresh, light grease after cooking | Not strong enough for thick baked-on buildup |
| Baking soda paste | Under $0.10 | Baked-on stains, cast iron grates | Avoid on glass-top smooth surfaces |
| White vinegar spray | Under $0.05 | Streak-free finishing wipe after scrubbing | Not suitable on natural stone surfaces nearby |
| Commercial degreaser | $0.50–$1.50 | Moderate to heavy baked-on grease | Use with ventilation open; always wear gloves |
| Foaming oven cleaner | $1.00–$2.00 | Extreme buildup, one-time deep restoration | Keep away from stainless steel and painted panels |
Most stove cleaning is a perfectly manageable DIY task, but there are situations where professional help is worth the cost — particularly if you've let buildup go for an extended period on a high-end appliance where you don't want to risk surface damage by experimenting with the wrong products. Professional appliance cleaning typically runs between $80 and $150 depending on your location and the condition of the stove, and many people find it worthwhile once or twice a year as part of a broader kitchen refresh. If you're thinking about other kitchen appliance upgrades while you're at it, our guide to the best warming drawers is a good read for anyone looking to make their kitchen setup work a little harder.
The most reliable approach combines soaking with targeted scrubbing rather than relying on force alone. Remove the grates or drip pans and let them soak in hot soapy water for 15 to 20 minutes, then scrub with a stiff brush and rinse clean. For the stovetop surface itself, a paste of baking soda and dish soap left on for five minutes before wiping handles most grease without damaging the finish beneath.
For stubborn baked-on grease, a longer soak combined with a commercial degreaser or a thick baking soda paste is your best starting point. Apply the cleaner, cover it with a damp cloth to prevent it from drying out, and let it sit for 20 to 30 minutes before scrubbing. A plastic scraper can lift the softened residue without scratching the surface underneath.
Yes, white vinegar is useful for light to moderate grease, especially as a finishing spray after you've done the main scrubbing with soap or baking soda. It cuts through oily residue and leaves surfaces streak-free. That said, vinegar alone is generally not strong enough to tackle heavy or baked-on buildup without being paired with something more abrasive like baking soda.
A light wipe-down after every cooking session is ideal, even if it's just a damp cloth across the surface while it's still slightly warm. At minimum, aim for a thorough wipe every few days, a deeper clean of removable parts once a week, and a full deep clean including soaking the grates and degreasing the hood filters once a month.
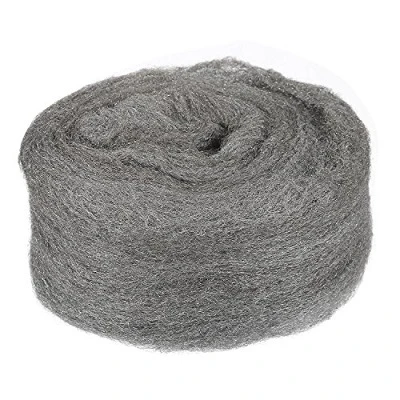
It depends entirely on the surface. Steel wool is generally safe on bare cast iron grates and can tackle truly stubborn buildup effectively, but it will scratch ceramic glass tops, stainless steel panels, and any painted surfaces. For anything other than cast iron or heavily enameled grates, a non-scratch scrubbing pad is the safer and more surface-friendly choice.
Baking soda and dish soap are the two most reliable natural options, working especially well when combined into a thick paste and left to sit before scrubbing. White vinegar serves well as a follow-up finishing spray after scrubbing. Citric acid is another effective natural option that cuts through grease and mineral deposits without scratching — you can find it in powder form at most grocery stores.
Avoid submerging electric coils in water or getting them excessively wet, since moisture can damage the electrical elements inside. You can wipe them carefully with a damp cloth once they've cooled completely after use. Most of the significant grease buildup on electric stoves ends up in the drip pans underneath the coils anyway, and those are perfectly safe to soak and scrub normally.
Yes, placing a splatter screen over your pans during frying or sautéing significantly reduces the amount of grease that lands on your stovetop and the surrounding surfaces. It won't eliminate buildup completely, but it can noticeably cut down on the frequency and intensity of cleaning sessions, which means less accumulated effort over weeks and months of regular cooking.
Now that you have a clear, practical picture of how to clean grease from stove surfaces — from the right tools and cleaner matching to step-by-step methods and a monthly routine — the best next step is to pick one habit from this guide and put it into action after your very next meal. Start small if you need to: even a quick damp-cloth wipe while the stove is still warm makes a meaningful difference over time, and the momentum of keeping things clean tends to build on itself naturally. Head over to the kitchen cleaning section for more guides that help you keep every part of your cooking space looking and working its best.
 |
 |
 |
 |

About Daisy Dao
Daisy Dao grew up in Honolulu, Hawaii, where coastal living and access to fresh local ingredients shaped her approach to home cooking from an early age. She has spent years experimenting with seafood preparation, healthy cooking methods, and ingredient substitutions — developing hands-on familiarity with a wide range of kitchen tools, techniques, and produce. At BuyKitchenStuff, she covers healthy recipes, cooking techniques, and ingredient substitution guides.
Check for FREE Gifts. Or get our Free Cookbooks right now.
Disable the Ad Block to reveal all the recipes. Once done that, click on any button below
|
|
|
|
