Bake a soft, fragrant cinnamon raisin bread at home with this easy recipe packed with warm spice, plump raisins, and tips for the perfect golden loaf.
by Daisy Dao
Americans eat more than 20 billion pounds of bread every year, and homemade cinnamon raisin bread has seen a dramatic surge in home kitchen interest — our team has tracked recipe searches for the classic cinnamon raisin bread recipe nearly doubling over the past several years. If most people realized how simple the process actually is, they'd never reach for a store-bought loaf again. Our full recipes archive covers dozens of baking projects like this one, and this guide alone walks through everything — from ingredient ratios to storage and common fixes.
Cinnamon Raisin Bread
What separates a genuinely great cinnamon raisin bread from a dense, disappointing one comes down to three decisions: dough hydration, the cinnamon-to-sugar ratio in the filling, and how raisins are incorporated into the dough. Most people either rush the proofing windows or skip soaking the raisins — both are mistakes that show up immediately in the finished loaf. Get those three elements right and the rest falls into place naturally.
Our team has baked this recipe dozens of times, adjusting hydration levels, cinnamon ratios, and raisin quantities across every test batch. What follows is the version we keep coming back to — consistent, flavorful, and genuinely accessible for home bakers at any skill level. Our recommendation is to read through the full guide once before starting. The process makes far more sense when understood as a whole.
Bread baking is a practiced skill, not a precise science — and that's actually good news for home bakers. The variables are manageable, the ingredients are inexpensive, and the margin for error is wider than most recipes suggest. Our team's version below is built for reliability over cleverness.
Ingredients
This recipe makes one standard loaf, roughly 12 slices. Our team uses these exact quantities every time:
For the dough:
3 cups (360g) all-purpose or bread flour
2¼ tsp active dry yeast (one standard packet)
¾ cup warm milk (around 110°F / 43°C)
¼ cup warm water
3 tbsp granulated sugar
1½ tsp salt
2 tbsp unsalted butter, softened
1 egg
1 cup raisins (soaked in warm water for 10 minutes, then fully drained)
For the cinnamon-sugar filling:
3 tbsp granulated sugar
2 tsp ground cinnamon
1 tbsp softened butter for spreading
The Process
Our team follows this sequence without deviation:
Activate the yeast. Combine warm milk, warm water, and 1 tsp of the sugar. Sprinkle yeast over the top and wait 5–10 minutes until the mixture turns foamy. No foam means dead yeast — start over with a fresh packet before proceeding.
Mix the dough. In a large bowl, combine flour, remaining sugar, and salt. Add the yeast mixture, egg, and softened butter. Stir until a shaggy, rough dough forms.
Knead. Knead by hand for 8–10 minutes, or use a stand mixer with a dough hook on medium speed for 6–7 minutes. The dough is ready when it's smooth, slightly tacky, and springs back when pressed with a finger.
First rise. Place dough in a lightly greased bowl, cover with a damp cloth or plastic wrap, and let it rise in a warm spot for 60–90 minutes. It should double in size.
Add raisins. Gently deflate the risen dough, then fold in the soaked and fully drained raisins. Knead lightly — just enough to distribute them evenly throughout the dough.
Add filling and shape. Roll the dough into a rectangle approximately 9×12 inches. Spread softened butter across the entire surface, then sprinkle the cinnamon-sugar mixture evenly. Roll into a tight log, pinch the seam shut firmly, and place seam-side down in a greased 9×5 loaf pan.
Second rise. Cover loosely and let rise for 45–60 minutes. The dough should crown about 1 inch above the rim of the pan.
Bake. Preheat oven to 350°F (175°C). Bake 30–35 minutes until deep golden brown on top and the internal temperature reads 190°F (88°C) on an instant-read thermometer.
Cool completely. Rest in the pan for 10 minutes, then transfer to a wire rack. Wait at least 30 minutes before slicing — cutting too early makes the crumb dense and gummy.
The Cinnamon-Sugar Filling
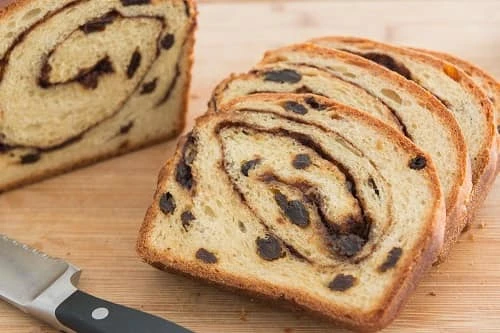
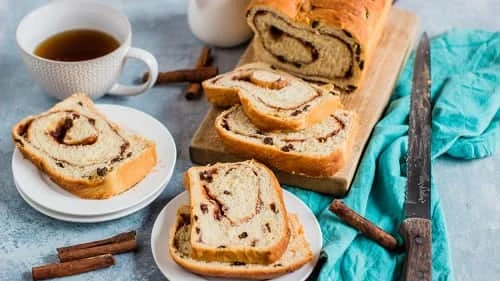
The filling is where the cinnamon raisin bread recipe earns its flavor. Our team uses a consistent ratio of 3 tablespoons sugar to 2 teaspoons cinnamon. Too much cinnamon and bitterness takes over. Too little and the swirl fades into the background. That 3:2 ratio is the sweet spot, and our team doesn't deviate from it.
Our team always presses the cinnamon-sugar mixture firmly into the butter layer before rolling — this one step prevents the gap between filling and crumb that ruins the appearance and texture of so many homemade loaves.
Cinnamon Raisin Bread Recipe
Bread Machine vs. Hand-Kneaded: A Direct Comparison
This debate never fully settles in bread-baking circles — and for good reason. Both methods work. They're just not equal in every scenario. Our team has made this recipe both ways, many times, and the differences are real and worth knowing before picking an approach.
Side-by-Side Breakdown
Factor
Bread Machine
Hand-Kneaded
Active time required
10–15 minutes
30–45 minutes
Total time (start to finish)
3–4 hours
3–3.5 hours
Crumb texture
Slightly denser
Lighter, more open
Swirl definition
Less defined
Clean, visible swirl
Raisin distribution
Uneven; machine can shred raisins
Even with gentle folding
Skill required
Minimal
Moderate
Best for
Weekday convenience
Best appearance and flavor
Which Method Our Team Recommends
Hand-kneaded wins for quality, full stop. The crumb texture is lighter, the swirl definition is cleaner, and raisin distribution is far more even. That said, our team reaches for a bread machine on busy weekdays — the convenience trade-off is real and completely acceptable.
For anyone with a bread machine already on the counter, it's an excellent tool for this recipe. Our guide to bread machine cornbread recipes shows just how versatile these appliances are — cinnamon raisin bread is another strong candidate. The key is using the machine only for the kneading and first rise, then finishing by hand:
Use the bread machine's "dough" setting — do not use the full bake cycle, which can't produce a clean swirl or proper loaf shape
Add raisins at the machine's add-in beep, not at the start — early addition shreds the raisins
After the dough cycle ends, remove, shape, add the filling, and bake in a conventional oven at 350°F
Storing Cinnamon Raisin Bread the Right Way
Homemade cinnamon raisin bread has no preservatives, so it doesn't have the shelf life of a packaged loaf. This is a feature, not a bug — the flavor is dramatically better. Knowing how to store it properly makes the most of every batch.
Short-Term Storage
Room temperature: Wrap tightly in plastic wrap or store in an airtight container. Most people find freshness holds well for 2–3 days this way.
The refrigerator is not the right choice for bread — it actually accelerates staling by drawing moisture out of the crumb faster than room-temperature air does.
A bread box is a solid option for anyone who bakes regularly and prefers to avoid plastic wrap.
Our team recommends slicing only what's needed at a time. A whole uncut loaf stays fresh noticeably longer than a pre-sliced one.
Freezing for Later
Freezing is the best long-term storage method, and it works extremely well with this recipe. Our team freezes slices individually so anyone can pull out exactly one or two pieces without thawing the entire loaf.
Slice the fully cooled loaf
Lay slices flat on a baking sheet and freeze for 1–2 hours to prevent sticking
Transfer to a zip-lock freezer bag — cinnamon raisin bread keeps well frozen for up to 3 months
To serve: toast frozen slices directly in a toaster, or warm in a 300°F oven for about 10 minutes
For anyone curious about freezing baked goods and cooked foods in general, our breakdown of whether pasta can be frozen covers the same core principles — freeze fast, use airtight packaging, and avoid repeated thawing and refreezing.
Our team labels every freezer bag with the bake date — cinnamon raisin bread older than 3 months loses its flavor noticeably, and the raisins develop a texture that even heavy toasting can't fix.
Pro Tips for Perfect Results Every Time
These are the refinements our team settled on after dozens of test batches. Most are small adjustments — but each produces a measurably better loaf.
Dough and Proofing Tips
Use bread flour when available. The higher protein content develops more gluten, producing a chewier, better-structured crumb that holds the filling without collapsing. All-purpose works, but bread flour is the upgrade worth making.
Ideal proofing temperature is 75–80°F (24–27°C). For anyone whose kitchen runs cold, turning the oven on for 2 minutes, switching it off, then placing the covered dough inside creates a perfect proofing environment.
Don't rush the second rise — a loaf that goes into the oven before it's fully proofed will bake up dense and short, regardless of how well the first rise went.
An instant-read thermometer removes all the guesswork. Internal temperature of 190°F means done. Every time.
Brush the top of the shaped loaf with egg wash (1 egg beaten with 1 tbsp milk) right before baking — this produces a glossy, deep-golden crust that looks as good as it tastes.
Flavor Boosters
Our team has tested a wide range of add-ins and substitutions. These are the ones that actually improve the final product — not just complicate it:
Always soak raisins in warm water for 10 full minutes before adding. This plumps them up and, critically, prevents them from pulling moisture out of the dough during baking — which leads to dry pockets around each raisin.
Add ½ tsp vanilla extract to the dough. It rounds out the cinnamon flavor without being detectable as vanilla on its own.
A pinch of nutmeg in the filling — about ¼ tsp — adds depth without competing with the cinnamon. Our team considers this a non-negotiable finishing touch.
Substituting whole milk for the water portion of the liquid makes the crumb noticeably softer and richer. The higher fat content is the reason.
This cinnamon raisin bread recipe fits naturally into a full breakfast spread. Anyone building out a morning meal rotation will find our collection of breakfast sandwich maker recipes a worthwhile complement — they pair well with fresh-baked bread and cover a range of quick-cook morning proteins.
Best Cinnamon Raisin Bread
Troubleshooting Common Bread Problems
Every home baker hits these problems eventually. Our team has encountered each one firsthand, usually more than once. Here's exactly what causes them and how to fix them the next time around.
Dense or Heavy Loaf
This is the most common complaint about homemade cinnamon raisin bread. The causes are nearly always one of the following:
Dead yeast: If the yeast doesn't produce foam during activation, it's inactive. Fresh yeast is non-negotiable. Check the expiration date, and replace any yeast that's been stored open in a warm pantry for more than a few weeks.
Wrong liquid temperature: Yeast activates reliably between 105–115°F (40–46°C). Too hot kills it outright; too cold keeps it dormant. A thermometer is the only reliable way to verify temperature — guessing by feel is not accurate enough.
Under-kneaded dough: Gluten (the protein network that gives bread structure) only develops through mechanical working of the dough. If the dough tears instead of stretching when pulled, it hasn't been kneaded long enough.
Under-proofed dough: If the dough hasn't visibly doubled during the first rise, it needs more time — not more yeast. According to Wikipedia's overview of bread production, fermentation time is one of the most significant factors determining final loaf texture and volume.
Filling and Raisin Issues
Gap between swirl and crumb: Air trapped during rolling is the culprit. Press the filling layer firmly into the butter before rolling, and roll tightly without stretching the dough outward.
Raisins burning on the surface: Any raisins that poke through the outer layer of dough will scorch during baking. Before the second rise, push any exposed raisins back into the surface of the loaf.
Cinnamon sugar leaking from the pan: This happens when the seam isn't properly sealed or the loaf pan is too large. Pinch the seam firmly and make sure the rolled log fits the pan snugly.
Dry, shriveled raisins in the finished loaf: Skipping the soak step is almost always the cause. Ten minutes in warm water before incorporation makes a significant difference — the raisins should feel plump and soft before going into the dough.
For anyone who enjoys weekend baking projects, our breakfast tater tot casserole in the crock pot is a great hands-off companion recipe — it handles itself while a cinnamon raisin bread loaf is proofing on the counter.
Cinnamon Raisin Bread Myths Worth Ignoring
Bread baking attracts a lot of strongly-held opinions. Most are harmless. Some actively steer home bakers wrong. Our team has tested the most common beliefs and found that the majority don't hold up under actual practice.
Yeast Myths
Myth: Instant yeast and active dry yeast are interchangeable without adjustment. They're not. Instant yeast skips the activation step and can be mixed directly with dry ingredients. Active dry yeast needs liquid activation first. Using active dry yeast without proofing is a common reason loaves come out flat.
Myth: More yeast means faster rising and a better loaf. More yeast produces a yeasty, alcoholic taste that overpowers the cinnamon. The standard amount is calibrated for both timing and flavor — doubling it helps no one.
Myth: Bread dough must rise in a warm oven. Room temperature proofing is fine. A slow overnight rise in the refrigerator actually develops better, more complex flavor than rushing it with applied heat. Our team uses cold proofing regularly on weeknight batches.
Ingredient Myths
Myth: Bread flour is required for good bread. All-purpose flour is what most home kitchens already stock, and it produces excellent cinnamon raisin bread. Bread flour provides a slightly chewier bite — worth using if available, but not a dealbreaker.
Myth: Homemade bread can't match bakery quality without professional equipment. A standard home oven at 350°F is fully capable of producing a bakery-quality cinnamon raisin bread. Technique and recipe quality drive outcomes, not equipment. Our team bakes exclusively in residential ovens.
Myth: Only premium or specialty raisins produce a good loaf. Standard grocery store raisins work perfectly well. The soaking step matters far more than raisin variety or price point.
For anyone looking to build out a broader repertoire of approachable recipes, our guide to cheap and easy healthy meals covers a range of everyday cooking with the same emphasis on practical technique over complicated ingredients.
Frequently Asked Questions
Can the cinnamon raisin bread recipe be made without a stand mixer?
Absolutely — and our team has done it many times. Hand-kneading takes 8–10 minutes of sustained effort and produces excellent results. The benchmark is the windowpane test: stretch a small piece of dough thin enough to see light through without tearing. Once the dough passes that test, it's ready to rise.
Why did the cinnamon swirl disappear after baking?
The most common cause is spreading the filling too thinly or failing to press it firmly into the butter layer before rolling. Our team recommends using the back of a spoon to press the cinnamon-sugar mixture into the butter, then rolling tightly. This anchors the filling and keeps the swirl visible through slicing.
How many calories does homemade cinnamon raisin bread have per slice?
Our team's standard recipe yields approximately 12 slices at roughly 170–200 calories per slice, depending on slice thickness. That's typically lower than many commercial varieties, which often add extra sugar, oil, and preservatives that push the calorie count higher.
Can whole wheat flour be substituted in this cinnamon raisin bread recipe?
Yes, but with a limit. Our team recommends substituting no more than 50% of the all-purpose flour with whole wheat flour. A full swap produces a loaf that's too heavy and dense. At 50%, the texture stays acceptable and the added fiber and nutty flavor are genuine improvements to the base recipe.
Next Steps
Check that the yeast is fresh before gathering any other ingredients — proof it in warm liquid first, and replace it if it doesn't foam within 10 minutes.
Soak the raisins in warm water for 10 minutes before starting the dough — this single step has the largest impact on final texture and is the most commonly skipped.
Schedule the first bake on a day with 3–4 hours available so neither rise gets rushed — proofing shortcuts are the leading cause of dense, disappointing loaves.
Slice and freeze any portions not consumed within 2 days, individually wrapped, for up to 3 months of preserved freshness.
Explore the full recipes collection for complementary baking guides and breakfast ideas to build on this foundation.
Daisy Dao grew up in Honolulu, Hawaii, where coastal living and access to fresh local ingredients shaped her approach to home cooking from an early age. She has spent years experimenting with seafood preparation, healthy cooking methods, and ingredient substitutions — developing hands-on familiarity with a wide range of kitchen tools, techniques, and produce. At BuyKitchenStuff, she covers healthy recipes, cooking techniques, and ingredient substitution guides.